Friday, September 06, 2013

Good with a Grinder, Handy with a Hammer, a Wonder with a Welder

Some parts that were once available off the shelf (in the US) for some reason are no longer produced. For this reason it was decided to try and make the item in question a Floor support bracket. Best case scenario the "FSB" would be a perfect reproduction of the original. Worst case, I would pay someone to make a bracket. You can see in the pictures that there was not much of the original to work with, I had a lot of help from a good mate and lucky for me he is, Good with a Grinder, Handy with a Hammer, a Wonder with a Welder,The proof is in the pictures

Dizzy over the Distributor

I have spent countless hours trying to find a solution the a major issue. A distributor that I purchased on E-Bay for under $100.00 delivered to my front door, was hitting the manifold. The dizzy had the coil in the cap (this was to save space and wires in the engine bay) the physical size is one issue and the hight being the second. I spoke with the guy's at a performance shop where they have used this combination of 351W and RPM AIRGAP. The dizzy they use is the Accel with built in module, they had one on the shelf and seeing it I thought it would be ok. So off to VPW (Victorian Performance wholesalers) with the part number to purchase the dizzy, Some $400.00 dollars later I got home place the dizzy in the engine and this dizzy fowled in the same spots. The difference this time was, it is hitting the tabs that hold the cap on. No problem phone VPW and away I go again. They had one other distributor to try a Mallory part #:8455415. To use this dizzy I would need the Mallory HyFire6 part #:6852M and the recommended coil for this is the P#: . So now I have this ignition system that could electrocute me if I'm hot care full

Returning from the football.


A quick trip around the block


Tis is the first trip in the car for my two boys. I have two weeks to get the car ready for the Bright Rod Run. Fingers crossed.

Stage......err......I've lost count

OK, it's been two weeks and allot of planning has come down to the last two days (yesterday & Today).
Qik flash back: When The family and I went to Bright Last year we made it to Wallan. Then the Diff made noises it shouldn't have.....yada, yada, yada. New diff center. At the time I wanted 3.50:1, but they never had one in stock. So now it is time to replace the current ratio with the correct one. Also replacement tyres, as you can see in the previous posts these were burnt out.
Current tyres can be seen in the post below, the new tyres are 245x50x15 diameter of 25" 2 inches less than the others

More Power Scotty...

I just can't seem to let well enough alone. Had her on the road for 2 Rodding seasons and have decided to go up on the horsepower. What I had on there were the original iron heads with a little porting on the inlet. stock valve sizes, but with all the Hi-po gear bolted on. Compression was at a stock-ish 9.0:1. Replacement heads are RHS aluminum 180cc. 58cc chambers 2.02 Inlet & 1.6 Exh valves.
See link to Heads.
http://www.racingheadservice.com/Information/Technical/Heads/SBFord_180cc.asp

The calculated compression will be about 10.3:1, this should make the old girl get up and boogie. Well I hope it will.

Giving it a little squirt

Going for a cruise on fathers day. I just love to give her a squirt coming onto the freeway.

Tuesday, April 05, 2011


This is the first time on the dyno since the tune-up over a year ago.
before the tune-up it was good, but after the sound was awesome.
As you can hear she still sounds great.

Ararat Jail house Rock Festival


Another great weekend in Ararat.

Friday, September 04, 2009

Tyres Make all the Difference


White wall tyres added to the back have changed the overall look of the car.

Retirement at 56 years youg

From the beginning I have wanted a classic car. One that looked stock on the outside and went like the clappers.
My magic numbers were sub 14.0 and over 100mph.
I am happy to say those figures are finally mine, and my wife's....

13.86 sec at 104mph.

Now what, retirement?

Well, from racing anyway.

Sunday, August 16, 2009

The 400m dyno


This is the true measure of power.
Ever since the build project started I had it in my mind to have a 13sec car & reach 100mph.
For this reason I replaced the heads.....
Well now finaly the car has broken into the 13second braket and cracked 104mph.

Here is the wife on the very first run for the day.

Tune-Up-Date

After installing the new heads, and getting the tune up on the dyno.
The tune up was a huge waiste of money. The jets were put back to what I had originaly, The powervalve was replaced to what I put in the first time.
Once this was done a friend form the car club had an aniliser that measured the air fuel ratio. An ajustment to the vacum secondary spring to make the secondaries come in later.
After a test drive yiu could feel the defference straight away. The sound of the engine was gruntier as well.

This was really good as the Marsh Rodders drag Day was fast approaching....

Dyno tune, with new heads

New Heads (click here)

Here is a link to see the work in changing the heads on the engine.
Removed were the original steel heads, which received porting and some head work. Installed are a pair of RHS 180cc Aluminum heads

Saturday, January 17, 2009

Ain't She a Beautie


Thanks Peter, great work...

I just bought another 53 Customline


We have just returned from the Port Fairy Rod Run, Great event and fantastic people. Here is something I ordered the previous year and picked up this year.

Friday, July 18, 2008

Cant keep it have to sell. So..... 4 Sale, anybody

When you have completed the first build. What do you do,
You sell the second project cause you don't have the time to work on it.

Friday, May 09, 2008

14.52 @ 155.17kph


Went to Calder park, managed a 14.5 @ 155.17kph. Not what I was after but it gives me a starting point.

Monday, April 21, 2008

Some fun at Ballarat Rod Run

This is the first attempt at any sort of driving event. This was the best weekend, bar none.
Thanks to the guy's of the FUELERS...

I think all the hard work on the car has payed off........What do you think??


Long time no post

The reason I haven't published in a long time is due to driving the car. I have taken plenty of shots but now the time has come to re-size and post. Then finish off what we started on the car.
All I can say is. WATCH THIS SPACE......


Wednesday, November 21, 2007

Running in the engine

All hands were on deck to start and run in the cam. A fan in the front to keep it's cool. BUT!! If and when I ever run an engine for the first time like this I am going to remove the thermostat. I was really worried about overheating, the temp would come down to 90 deg/c then shoot over 130 deg/c. For a new engine and 12 month build I could see this engine hand-grenading. with a bit of water and the fan she went 30 minutes revving consistently between 2000 - 2500, and no dramas.
Next thing was to recheck the auto, all nuts and bolts, Brakes...etc
Then take her out for a spin around the block.

Sunday, November 04, 2007

she's a goer, in a nick of time...

I have been really busy with the car, I have started the motor, done a final check and had it inspected.
I required a noise level test and a brake test prior to the safety inspection.
It passed all three. I was so rushed that I would ring up in the morning for three different places I had to travel to and let them know about the reason for the importance, (the BRIGHT rod run is in less than 1 week) and they were too happy to help.

So after all the running around and final repairs she is on the road. When I get back I will be able to spend some quality time in front of the computer.
If you would like to see a little clip of the car, go to

http://www.youtube.com/watch?v=Cc-5b7K50X4

Cheers

Monday, October 15, 2007

Reverse lamp close up

As described below they fit in pretty well with the look I am after. You may not even realize they are there. The wires are run through the boot right in the corner below the brake light. Drilled a hole and inserted a grommet. The hole in the grommet is large enough to insert the 13mm corrugated flexible hose type tubing I have done all I can to prevent shorting of wires in this car. In my experience by the time you get a short in the wiring you have forgotten where the tight spots were. So I'm trying to eliminate them as much as i can now to avoid them when I least expect it.

Wednesday, October 03, 2007

Rusty lower gaurd and repair

The picture is pretty dark, bummer.

Reverse lamps

Reverse lights, are they really needed for club plates? If the car did not come with reverse lamps in 53. But, If I am reversing at night you can bet that I want to see what is behind me. So I fitted reverse lamps. These are Indicators from a Harley Davidson Motor bike, I chose them because they are small and discreet. All I had to do is replace the orange lamp inside for a clear type and away I went. I tried them at night and they are brighter than I thought they would be.

Replace the Front clip

Insert Pictures Here, @ a later date.

Exhaust Fitted


The exhaust was fitted with little effort. Bellarine Exhaust Centre, Daryl O'Reilly. I can not recommend his services enough, as you will see by the picture.

Thursday, September 06, 2007

Reliability, above all else

The engine is sitting in the car as a permanent feature...I hope. This is a fully balanced 351W. lucky for me it was a standard bore, now +.40.
Heads are mild ported and fitted with 1.6 Roller rockers, which are sitting on screw in studs. When using a cam with a large amount of lift and the valve spring are quite hard to compress. There is a tendency to pull the original pressed in rocker studs out of the head.
For added strength a Head stud kit is used I'm not running allot of compression but the studs fell within my budget. The cam is a COMP cam grind No. FW 280h-10, or part No. 35-226-3.
The inlet manifold is an Edlebrock, RPM AIR-GAP. It specs are from 1500 to 6500 rpm which will work well with this cam. Carbie is a Holley Street Avenger. 670 cfm vac sec. Fuel to the engine is through a Carter electric CAR-H4600P, 100gph 6-8 psi. water pump is Holden Red with large pulley mount. To give the maximum amount of clearance between pump and radiator. I'm going to run an 18" thermo fan.
But wait There's more..........

Looking a little tyred

The rear wheels looked a little tyre'd...R.D.R.R. I couldn't imaging driving on the original 6.75 x15's, 3 ply, nylon tyres. (I will sell the one shown here in pic. if you are interested, just send message).
I have measured the rear wheel arch so many time that in the end all the numbers were mixing in my head. So, Q: what is the widest tyre that I can fit under a stock 53 Cuzzo wheel arch????
A: 255x60x15,
11" at widest point, 27" dia. I can place my hand between the tyre on each side and the arch.
At the moment I am having to drop the front spring shackle to get the diff low enough to remove the tyre.
I'm getting good at it now Removal is down to 10 min. That's in a garage with all the tools at hand. The usual test will be on an un-even embankment in the middle of nowhere in the pouring rain.
I have other options, but I'll save them for next time...

Thursday, August 30, 2007

The Engine finaly blue


When you have a chance to have an engine painted by the builder, have the colour ready to go. I wasn't sure what colour I wanted, so,I said "Don't paint the engine, I'll do it when I know what colour I want." the sump was painted blue to protect it from rusting.
A few weeks went by still had no idea on colour, I have run out of time and have to paint it . A nice safe Ford Blue. Notice the oil filter, This is a "Z71" the second smallest of the RYCO filters. when the filter is sitting at the end of the thread, I have 10mm clearance.

Friday, August 10, 2007

Oh, no.

The fist thought that went through my head when one week to the day, this computer decided it was time to retire. with no warning except for the words "Disc read error".
Oh, no. all the pictures not backed up, snippets of video not yet edited together or backed up.
Having to re-install windows and all other programs.

Well here I am to keep this blogg I will post the latest pictures, so there will be a little jump in progress.

TTFN

Friday, July 20, 2007

Easy as 1, 2 & 3


steel tube cut into sections. After cutting in half and remembering which section is the good and which is the waist. (picture here is second attempt) Removing the top section from the waist fits perfectly in the bracket section.


A couple of tacks to hold the insert in place, this piece was shaped before the tacks were done. I have tried to tack and bend but the bends are not sharp enough.


Once the insert is welded in, a quick going over with a flap wheel and she's all shiny and ready to go

It is not the end, but the jurney it self. yada-yada-yada

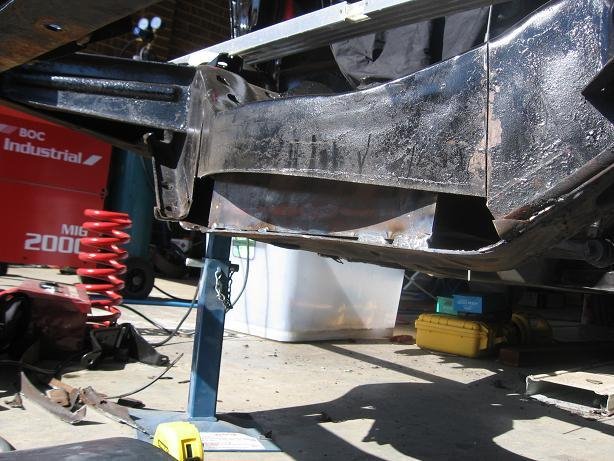
The bracket was the easy part of the section. 75mmx50mm tube steel trace around the template cut with grinder and away we go. The template also pin pointed the bolt holes, measure twice and cut once. No Problem........... I wish that were true.

Thursday, June 21, 2007

I'm so close I can almost see myself cruzzin around

Got the transmission back today, stage one shift kit. This will give a better than standard shift with nice firm changes. Other things are moving along nicely are finishing the floor section and the parcel shelf. covering all areas with a stone guard / body deadening to help with road noise etc..

Soon the brake lines will be run that will lead into fitting the engine and trans followed be the new wiring.....I'm so close I can almost see myself cruzzin around.

My favorite quote for the moment is:
I spent all my money on beer and hot rods. My wife waisted hers

Before

Here is a section of rusty steel that has to come out. Not pretty at all.

After

Here is the replacement for the rusty section

Monday, June 04, 2007

Good with a Grinder, Handy with a Hammer, a Wonder with a Welder

Some parts that were once available off the shelf (in the US) for some reason are no longer produced. For this reason it was decided to try and make the item in question a Floor support bracket. Best case scenario the "FSB" would be a perfect reproduction of the original. Worst case, I would pay someone to make a bracket. You can see in the pictures that there was not much of the original to work with, I had a lot of help from a good mate and lucky for me he's Good with a Grinder, Handy with a Hammer, a Wonder with a Welder,
The proof is in the pictures

Thursday, May 31, 2007

I couldn't think of a title

Thing are moving a little slow, but are still moving.
I am in the middle of removing some rust in the floor area on the drivers side, and the fire wall.
Once these area's are finished I will start assembly on the extras. Like brake booster and a master cylinder etc....
The transmission a C10 came with another motor was covered in years of oil dirt and what looked like a thick black grease. It was no match for a scraper and 20 liter's of Kero. The plan for this is a stage 2 shift kit and what ever else it will need to make it stronger and hopefully more reliable.

Monday, May 07, 2007

The engine has returned

The engine has come back ready to be fitted....But I'm keeping it under wraps.

What gauges....Where?

In between some panel replacement. I have started to make up a plate that will house some gauges. This sits behind a metal speaker mesh which can be seen in the earliest posts..I cant wait to see it, or not see it.

What is an iceberg?

What is an iceberg, yeah yeah, big block of ice. What i am referring to is the fact that about one ninth of the total mass of a berg projects above the water. So to cut to the chase.....what you see on top is only a small part of the whole thing.
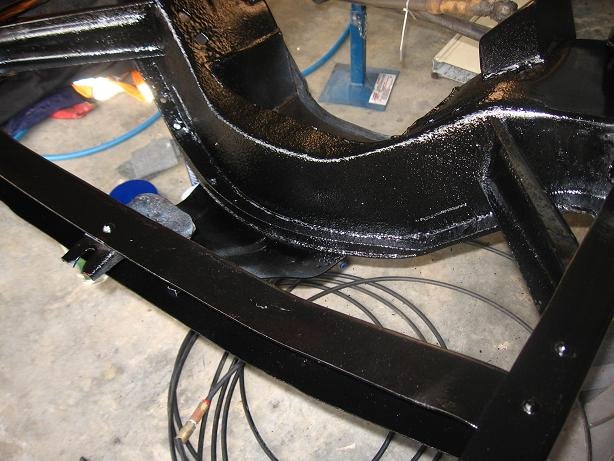
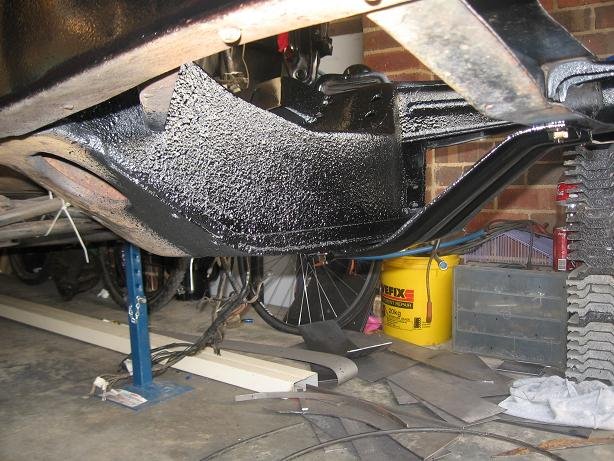
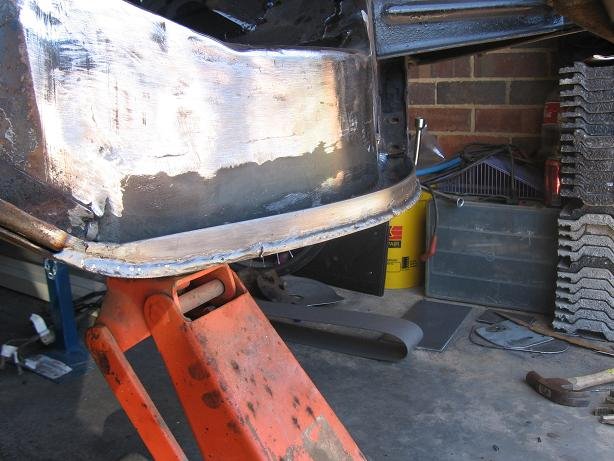
So, how much metal should be removed to get rid of that rust ridden piece of steel? about this much
The section of floor was removed because it is easier to replace it with a new flat piece. The holes for the accelerators weren't touched so I will be able to refit a new one in the original position. I am still trying to keep the original look inside the car

Monday, April 02, 2007

What's the Diff ?

The DIFFerence is noticeable when the two are placed together. The original diff and the 9" from an XA Falcon. The 9" was already shortened (narrowed) approx 2 inches either side. This will allow me to fit bigger wheels under the guard.
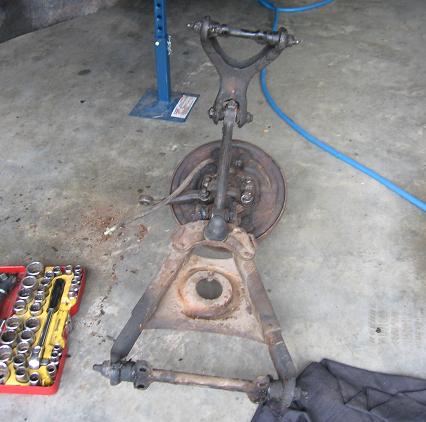
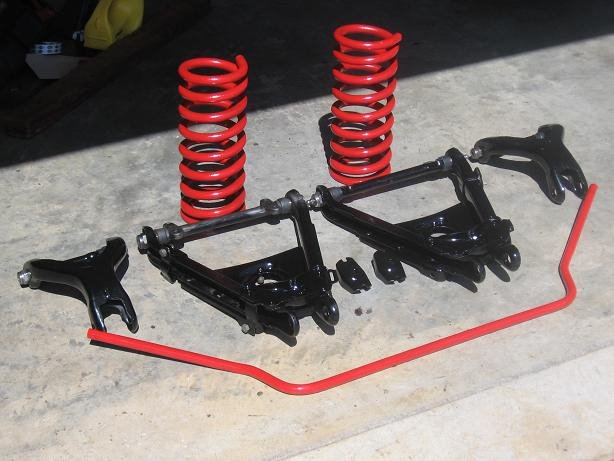
The problem with bigger wheels is that they wont fit between the diff and the guard.
I had to deflate the 195x60x15 tyre just to get the wheel off the original diff. My plan is to get a set of 255x50x15 white walls on 8" steelies under there now.
Of cause that will be another post....

Monday, March 05, 2007

To good to pass up

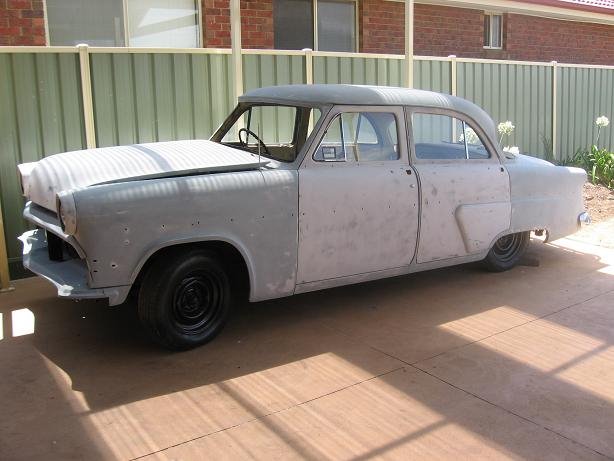
1954 Customline. This car is really nice. panels are straight and ready for a little paint. The hard part was trying to convince the wife to let me keep it so down the track I can start the rebuild process all over again. My chances are not looking good for now.

Tuesday, January 23, 2007

From little things, Big things grow.


The car steered very easily and road the bumps nicely. This was probably because there was no motor in it and I was rolling off the trailer and into the garage.

But none the less I want this car to ride as good as it can with the king pin steering with no power assistance.
I took a trip to The Rubber Connection to get some seals for the upper and lower arms, and when I walked in to the shop I was a kid in the proverbial candy shop. All replacement parts - all shiny - in original FoMoCo packaging but.
I managed to walk out with what I needed and not much of what I just wanted....My wife was glad as well.
So now I get to remove the front suspension and replace all the seals and bushes, then re-assemble and re-grease, along with a lick of paint or two.